Wireguard VPN Rasberry Pi zu Hetzner Cloud Server

Konfiguration
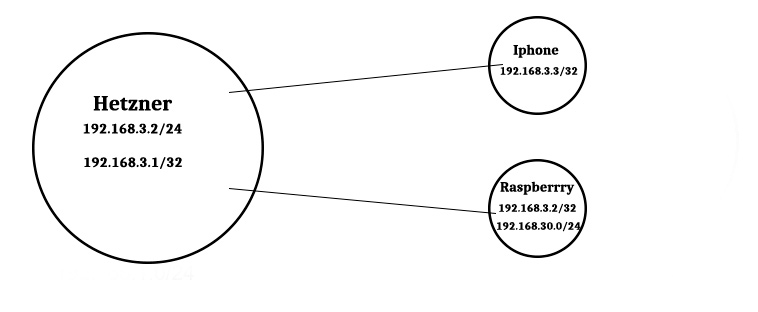
Client1 (Hetzner-CloudServer)
Als erstes sollte man die erforderlichen Schlüssel im Verzeichnis /etc/wireguard generieren.
cd /etc/wireguard
sudo wg genkey > private.key
sudo wg pubkey > public.key < private.key
sudo wg genpsk > psk.key
Nun erstellt man die Schnittstelle mit einer Adresse, einem Namen und weist ihr einen Private Key zu.
sudo ip link add wg0 type wireguard
sudo ip addr add 192.168.3.1/24 dev wg0
sudo wg set wg0 private-key ./private.key
Kernelheader ggf nachinstallieren
sudo apt install linux-headers-4.15.0-42-generic
modprobe wireguard
Dies muss in die Datei /etc/network/interfaces hinzugefügt werden.
auto wg0
iface wg0 inet static
        address 192.168.3.1
        netmask 255.255.255.0
        pre-up ip link add wg0 type wireguard
        pre-up wg setconf wg0 /etc/wireguard/wg0.conf
        up ip link set wg0 up
        down ip link delete wg0
Nun muss diese Datei /etc/wireguard/wg0.conf erstellt werden.
Für jeden weitern CLient einfach im Server ein Peer Eintrag hinzufügen
[Interface]
Address = 192.168.3.1/24
PrivateKey = PK CLient1
ListenPort = 50002
PreUp = iptables -A FORWARD -i wg0 -j ACCEPT; iptables -t nat -A POSTROUTING -o eth0 -j MASQUERADE
PostDown = iptables -D FORWARD -i wg0 -j ACCEPT; iptables -t nat -D POSTROUTING -o eth0 -j MASQUERADE


[Peer]
#Raspi
PublicKey = PubKey Client2
PresharedKey = Psk
AllowedIPs = 192.168.3.2/32, 192.168.30.0/24

[Peer]
#svenIphone
PresharedKey = Psk
PublicKey = PubKey Client3
AllowedIPs = 192.168.3.3/32
Weil in dieser Datei sicherheitskritische Schlüssel enthalten sind, sollte man auf jeden Fall die Rechte für die Datei einschränken.
sudo chmod 0600 /etc/wireguard/wg0
Interface starten
sudo wg-quick up wg0
Client 2
Schlüssel erzeugen.
cd /etc/wireguard
sudo wg genkey > private.key
sudo wg pubkey > public.key < private.key
Dies muss in die Datei /etc/network/interfaces hinzugefügt werden.
iface wg0 inet static
        address 192.168.3.2
        netmask 255.255.255.0
        pre-up ip link add wg0 type wireguard
        pre-up wg setconf wg0 /etc/wireguard/wg0.conf
        up ip link set wg0 up
        post-up ip route add 159.69.193.247 via 192.168.3.2 dev wg0 #Diese Zeile muss auch hier hinzugefügt werden
        down ip link delete wg0
Nun muss diese Datei /etc/wireguard/wg0.conf erstellt werden.
[Interface]
Address = 192.168.3.2/24
PrivateKey = Pk Client2
ListenPort = 50002
DNS = 8.8.8.8, 192.168.30.1
PreUp = iptables -A FORWARD -i wg0 -j ACCEPT; iptables -t nat -A POSTROUTING -o eth0 -j MASQUERADE
PostDown = iptables -D FORWARD -i wg0 -j ACCEPT; iptables -t nat -D POSTROUTING -o eth0 -j MASQUERADE

[Peer]
PublicKey = PubK. Client1
PresharedKey = PskKey
Endpoint = <IpClient1>:50002
AllowedIPs = 0.0.0.0/0
Client 3 (Iphone)
Schlüssel erzeugen. Am besten auf einer Linuxmaschine z.B. der Raspi.
cd /etc/wireguard
sudo wg genkey > private.key
sudo wg pubkey > public.key < private.key
Nun muss diese Datei /etc/wireguard/wg0.conf erstellt werden.
[Interface]
Address = 192.168.3.3/24
PrivateKey = PkKey Client3
ListenPort = 50002
DNS = 8.8.8.8, 192.168.30.1
#PreUp = iptables -A FORWARD -i wg0 -j ACCEPT; iptables -t nat -A POSTROUTING -o eth0 -j MASQUERADE
#PostDown = iptables -D FORWARD -i wg0 -j ACCEPT; iptables -t nat -D POSTROUTING -o eth0 -j MASQUERADE

[Peer]
PublicKey = PubKey Client1
PresharedKey = Psk
Endpoint = 159.69.193.247:50002
AllowedIPs = 0.0.0.0/0
Um zB am IPhone alles per QRCode Scan einzuricht muss das Packet qrencode installiert werden.
qrencode -t ansiutf8 < /etc/wireguard/mobile.conf
Portweiterleitungen vom Hetznerserver
Http(s) zb. zum NAS weiterleiten
iptables -t nat -A PREROUTING -p tcp -i eth0 --dport 80 -j DNAT --to 192.168.30.XX
iptables -t nat -A PREROUTING -p tcp -i eth0 --dport 443 -j DNAT --to 192.168.30.XX
Auf allen VPN Clients ggf ipv4 Forwading aktivieren
sudo sysctl -w net/ipv4/ip_forward=1